In the “Intermediate Electronics Projects” category, you’ll find projects that challenge your growing knowledge and help you dive deeper into more complex electronics concepts.
These projects often incorporate microcontrollers like Arduino or Raspberry Pi, along with sensors, actuators, and more advanced components. You’ll work on projects that require both basic circuit-building skills and the ability to program or work with logic.
Examples of intermediate projects include creating a temperature and humidity sensor with a display, building a motion detection alarm system, or controlling a stepper motor with precision. You might also explore wireless communication by creating Bluetooth-controlled devices or learning to interface with sensors like ultrasonic distance sensors for robotics or automation projects.
These projects help you develop a stronger understanding of both electronics and programming, and they’re ideal for those looking to expand their skills and start building more functional, interactive systems.
Intermediate Projects
Intermediate Projects
Basic Home Alarm System
This Home Alarm Circuit detects sound using an electret microphone and a Schmitt Trigger-based circuit to activate a siren when triggered. It uses a 74C14 IC (Schmitt Inverter gates) along with a bootstrap transistor arrangement to process the signal. When a sound is detected, the circuit momentarily changes state, turning on a transistor and triggering the alarm. An EXIT button allows the user to disable the siren temporarily while leaving the property.
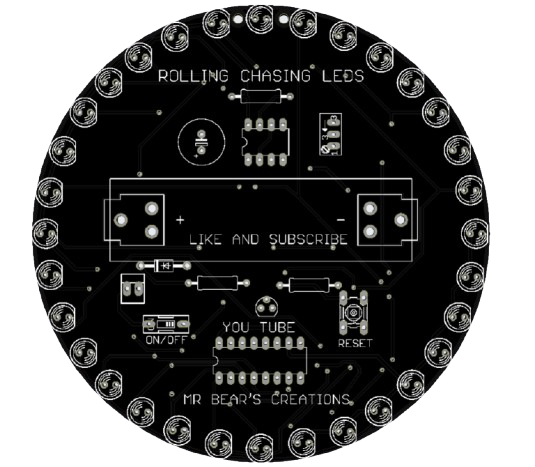
This is a straightforward project designed for individuals interested in learning about electronics and soldering. It is centred around the 74595 Shift Register logic chip. Upon completion, the LEDs will rotate around the perimeter of the board, with the speed of the rotation adjustable via the potentiometer.
In this project, you’ll use a temperature sensor (like the DHT11 or LM35) to measure ambient temperature and display the readings on an LCD screen. It’s a great introduction to sensor interfacing and working with displays, and it helps you understand how to convert sensor data into a readable format.
Light-sensitive projects (photoresistors)
A light-sensitive project uses a photoresistor (LDR) to detect changes in light levels and can trigger actions based on the environment’s brightness. For example, it could be used to automatically turn on a light when it gets dark or control the brightness of an LED based on surrounding light levels. This project helps you understand how sensors can respond to real-world conditions.
Temperature Sensor (LM35 or DHT11)
This project measures temperature using the LM35 analogue sensor or the DHT11 digital sensor. It helps beginners understand how to interface sensors with microcontrollers (such as Arduino) and display temperature readings.