
Building an 8-Bit Computer from Scratch
A Deep Dive into Ben Eater’s Educational Project
Constructing a computer from the ground up offers invaluable insights into the intricate workings of digital electronics. Renowned educator and YouTuber Ben Eater has embarked on an ambitious project titled “Build an 8-Bit Computer From Scratch,” guiding enthusiasts through the process of creating a functional 8-bit computer using breadboards and 7400-series logic chips.
Project Overview
Ben Eater’s initiative involves assembling a programmable 8-bit computer entirely from basic logic gates. The project is meticulously documented through a series of YouTube videos, providing viewers with a step-by-step walkthrough of each phase of the build. This hands-on approach demystifies computer architecture and offers practical experience in digital circuit design.
Key Components of the Build
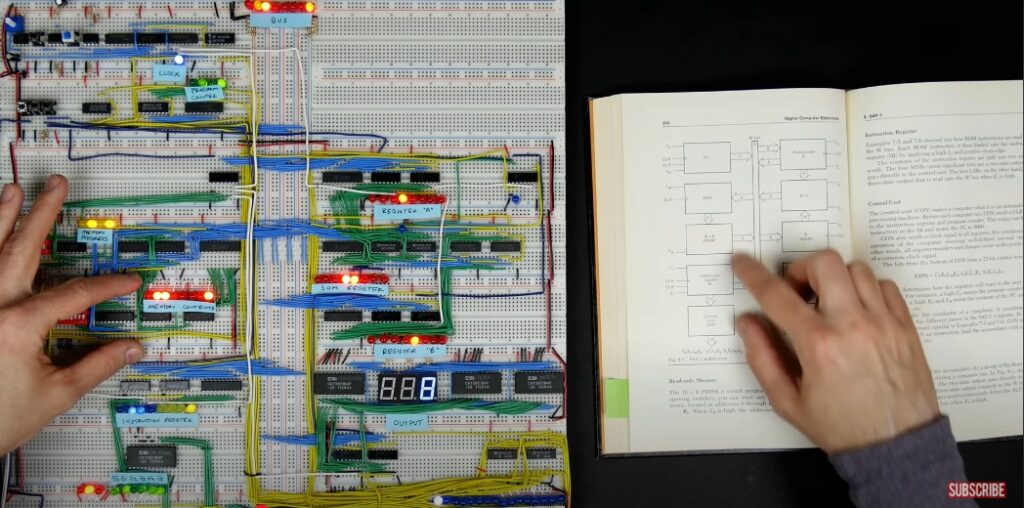
The computer is constructed using standard 7400-series logic chips, organized into several functional modules:
- Clock Module: Generates timing signals to synchronize the computer’s operations.
- Registers and Arithmetic Logic Unit (ALU): Handle data storage and perform arithmetic and logical operations.
- RAM and Program Counter: Manage memory storage and track the sequence of executed instructions.
- Control Logic: Interprets instructions and orchestrates the computer’s operations.
Educational Value
This project serves as an exceptional educational tool, offering insights into fundamental computing concepts such as binary arithmetic, memory addressing, and instruction execution. By following Ben Eater’s guidance, builders can gain a tangible understanding of how computers process information at the hardware level.
Acknowledgments
The “Build an 8-Bit Computer From Scratch” project is the intellectual property of Ben Eater. For comprehensive guides, video tutorials, and additional resources, please visit Ben Eater’s official website. citeturn0search0
Engage with the Community
Enthusiasts and learners are encouraged to join discussions and share their experiences. Platforms such as Reddit host communities where individuals can exchange tips, modifications, and insights related to Ben Eater’s 8-bit computer project. citeturn0search3
Embarking on this project not only enhances one’s understanding of computer architecture but also fosters a deeper appreciation for the complexities involved in modern computing systems.
Building an 8-Bit Computer from Scratch: From Schematics to PCB with Ben Eater’s Design
As you may know, Ben Eater’s “Build an 8-Bit Computer From Scratch” project is a fantastic hands-on learning experience that provides deep insights into the fundamentals of computer architecture. After watching Ben’s project unfold, I decided to take it to the next level by designing my own schematics for each part of the computer and building it on a custom PCB (Printed Circuit Board).
Creating the Schematics
The first step in my journey was to recreate and customize the core components of Ben Eater’s 8-bit computer, such as the clock module, registers, arithmetic logic unit (ALU), and memory circuits. For this, I used schematic design software to sketch out each module and ensure that the connections between the various components were correct.
- Clock Module: This generates the timing signals that sync up all the operations within the computer. In my design, I focused on ensuring stable clock pulses for reliable operation.
- Registers: These hold data temporarily, allowing the computer to process instructions sequentially. I designed multiple registers to manage various data paths and operations.
- ALU (Arithmetic Logic Unit): The heart of any computer, this is where all arithmetic and logical operations occur. I tailored my design to handle basic operations like addition, subtraction, AND, OR, and other logical functions.
- Memory Modules: In my version, I created the RAM and program counter to handle program execution and data storage.
Designing the PCB
Once I had the schematics ready, it was time to move on to PCB design. With my custom designs in hand, I used PCB design software to lay out the components onto a board. The goal was to create a compact and efficient design that would be easy to assemble, with all components neatly organized for easy access and testing.
The PCB was designed to accommodate all of Ben Eater’s modules, while also leaving room for further enhancements or custom modifications. After testing and ensuring that my design was correct, I generated the Gerber files — the standard format used by manufacturers to produce PCBs.
Getting the PCB Manufactured
Once the Gerber files were ready, I sent them off to JLCPCB.com for manufacturing. JLCPCB is known for producing high-quality PCBs at a reasonable price and quick turnaround, which made it the perfect choice for this project. I uploaded my Gerber files, selected the board specifications (such as size, thickness, and copper weight), and placed the order.
In just a few days, my custom-designed PCBs were ready for assembly. The boards arrived with all components perfectly etched, and I was now ready to start assembling my 8-bit computer on a professional-grade PCB. The process of designing and manufacturing my own PCB not only made the project feel more personal but also helped me better understand the complexities of real-world electronics design and manufacturing.
Assembling the Computer
With my PCBs in hand, I began the process of assembling the components — from placing the ICs to soldering the resistors, capacitors, and other essential parts. As each part came together, I could see Ben Eater’s original design come to life on my custom board. It was incredibly rewarding to see my unique twist on his project taking shape.
The next steps include programming the computer’s firmware and testing each module to ensure everything functions as intended. I plan to document the entire assembly process in future posts, but so far, it’s been an exciting journey from schematics to PCB.
Acknowledgements
Of course, none of this would be possible without Ben Eater’s original project, which provides an excellent foundation for anyone looking to understand how computers work at a fundamental level. This project has allowed me to push my own learning further by designing a custom PCB, but I must credit Ben for his incredible work in making the 8-bit computer project accessible to everyone.
For anyone interested in learning more about Ben Eater’s original project, be sure to check out his official site at eater.net or his YouTube channel. It’s an invaluable resource for those looking to dive deeper into computer architecture.
Conclusion
Building an 8-bit computer from scratch on a custom PCB is not only a rewarding challenge, but it also provides a deeper understanding of how computers work at a fundamental level. From schematics to a fully functioning PCB, this project has taken Ben Eater’s brilliant design and elevated it with custom engineering. The learning journey continues as I finish the assembly, and I can’t wait to share the progress in future posts.
Stay tuned for more updates on this project, and feel free to join in the conversation if you’re working on your own version of Ben Eater’s 8-bit computer.
Pingback: Unlocking the Power of Eagle CAD: A Comprehensive Guide – pcbelectronics.co.uk